Technical Blogs and Daily IT Infrastructure issues and resolutions
Search This Blog
Memory tiering in vSphere
Memory tiering in vSphere
Advanced Memory Tiering Now Available with VMware Cloud Foundation 9.0
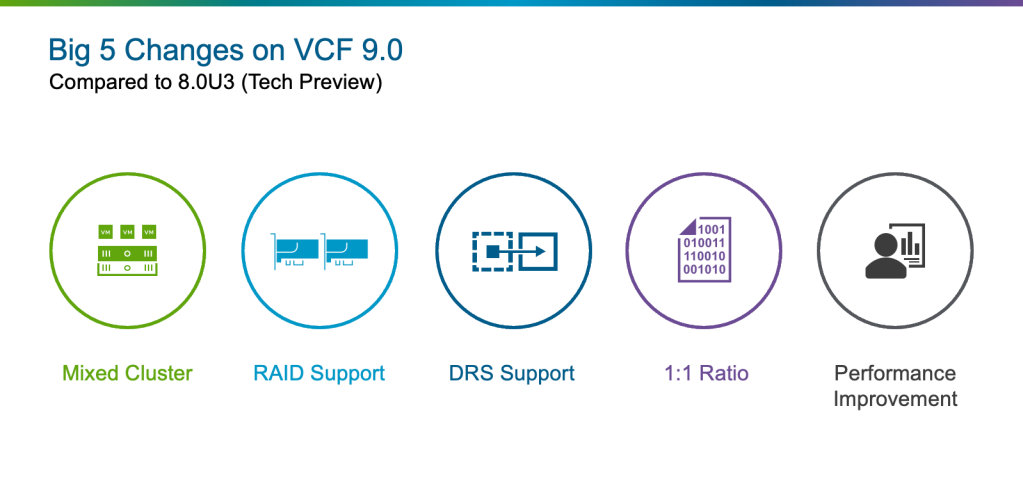
Memory Tiering reduces cost while increasing resource utilization, and was introduced as a tech-preview in vSphere 8.0U3 and was very well-received by customers. (see vSphere Memory Tiering – Tech Preview in vSphere 8.0U3 – VMware Cloud Foundation (VCF). The feedback from customers focused on data resiliency, security, and flexibility in hosts and VM configurations/controls. With the launch of VCF 9.0, these concerns have been addressed. Memory tiering is now a production-ready solution, including DRS and vMotion awareness, improved performance, a default improved 1:1 DRAM:NVMe ratio, and many more improvements to deliver a robust feature.
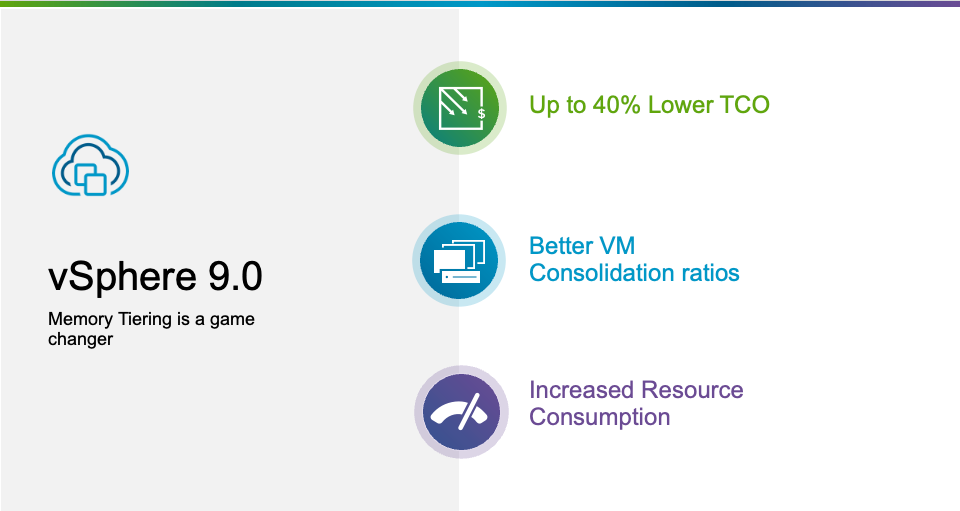
Extensive internal testing was conducted at Broadcom, and it was observed that Memory Tiering can provide up to 40% TCO savings for most workloads, as well as unleashing an increased CPU utilization of up to 25% – 30% more cores for workloads. Less cost, and more resources – Who doesn’t want that?!? Lastly, better VM consolidation ratios could also mean less servers, or more VMs per server.
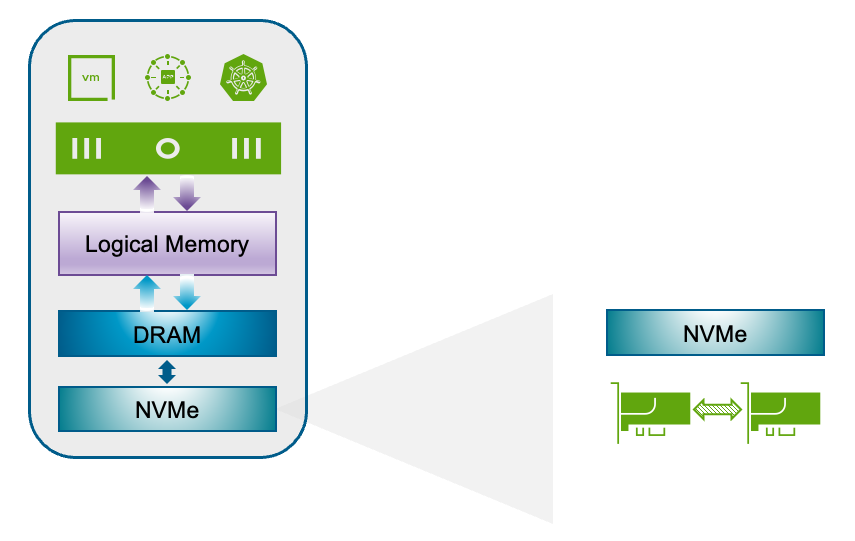
Memory Tiering delivers these and many benefits by utilizing NVMe device(s) as a second tier of memory, increasing your memory footprint up to 4x, while leveraging existing server slots for inexpensive devices like NVMe. There are many key differences between our Tech Preview release and our production-ready release with VCF 9.0. Let’s take a look at those enhancements.
Mixed Cluster
Memory Tiering can be configured on all the hosts in a cluster, or you can opt to only configure this feature in a subset of a cluster. There are many reasons why you would do that, for example, you may want to test on one host and a handful of VMs, maybe only a few hosts have open slots for NVMe devices, or you may only be approved to procure a small number of drives. The good thing is, we support all these and many other scenarios, to meet our customers where they are at. You have the option to choose some hosts, or go all in.
Redundancy
Redundancy is always top of mind in architecture designs. I can’t really say I’ve ever seen a design with only one NIC per server. When it comes to storage devices, we can easily introduce redundancy with the configuration of RAID, and that is exactly what we are delivering. Memory Tiering is capable of consuming 2 or more NVMe devices in a hardware RAID configuration to provide redundancy in case of device failure.
DRS Support
DRS has been around for quite some time, and I still think of it as magic. This is a feature most customers can’t live without. We worked really hard to build intelligence into the Memory Tiering algorithm to not only see and understand the state of memory pages, but to be smart and handle those pages appropriately across the cluster.
DRAM:NVMe – New Ratio
In vSphere 8.0U3 with introduced Memory Tiering as Tech Preview to allow customers to test this feature. However, the default ratio at the time was 4:1 ratio, meaning that we have 4 parts DRAM and 1part NVMe. Well, that translates into a memory increase of 25%, and even though it sounds small, when you do a price comparison of a 25% memory increase with DRAM vs NVMe, you would understand how big of a deal this is.
In VCF 9.0 we are changing the default ratio after all the performance improvements that were done. The default DRAM:NVMe ratio is now 1:1 – Yes, that is a 2x increase in memory by default, and this ratio setting is customizable based on the workloads and needs. So, this means that if you have ESX hosts with 1TB of DRAM and you leverage Memory Tiering, you can end up with hosts with 2TB of memory. Because this setting is customizable and some workloads can greatly take advantage of this feature such as VDI, you can have ratios of up to 1:4 where you quadruple your memory footprint for a very low cost.
Other Improvements
There are many other improvements introduced in Memory Tiering with VCF 9.0. Overall performance improvements across the board, made this solution robust, flexible, redundant and secure. From a security standpoint, we also introduced encryption for Memory Tiering at both the VM level as well as the Host level, where VM memory pages are encrypted either per VM or for all VMs within a host with a simple, easy to configure approach.
Assessing Eligibility
How do I get started? How do I know if my workloads are good candidates for Memory Tiering?
Customers should consider the following factors when deciding to deploy memory tiering.
Active Memory
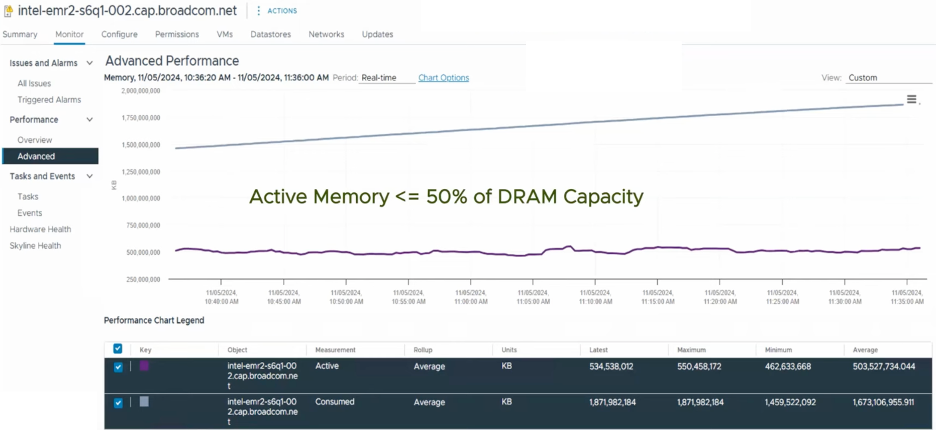
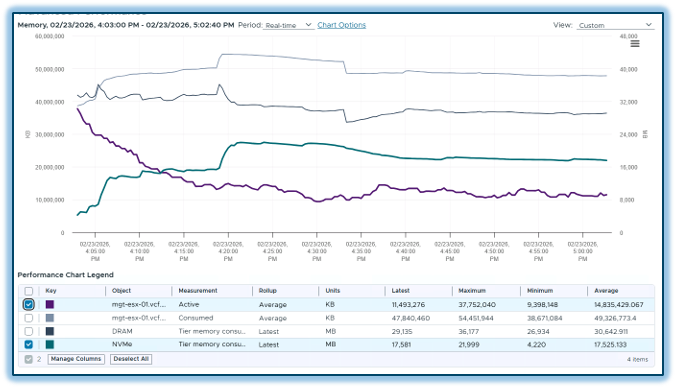
Memory tiering is ideal for customers with high consumed (allocated to all the VMs) memory (>50%) but low active (actively used at any point by workloads) memory (<50% of total DRAM).
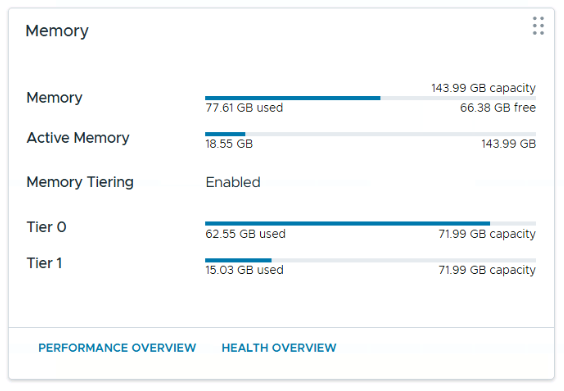
The screenshot below shows how Active Memory and DRAM Capacity can be monitored using vCenter:
NVMe device
There are performance and endurance guidelines for supported drives, with 1500+ options listed in the Broadcom (VMware) Compatibility Guide. NVMe drives, like E3.S, are pluggable and can often be added using available slots on servers such as the Dell PowerEdge below. (Dell PowerEdge R760 Rack Server | Dell United States). We highly recommend customers to consult the Broadcom compatibility guide to ensure workload performance by selecting the recommended devices.
More Memory, Less Effort: Configuring Memory Tiering in VCF 9.1
Introduction
Memory Tiering in VCF 9.1 lets you extend your memory capacity by using high-speed NVMe devices as a Tier 1 layer alongside DRAM (Tier 0), and the business case is compelling. You can consolidate more VMs per host, lower your TCO by delaying costly DRAM upgrades, and consume existing resources far more efficiently. The hypervisor manages data placement automatically, so your workloads get more addressable memory without any major hardware changes.
What makes VCF 9.1 a genuine leap forward is how dramatically simpler the configuration experience has become. The entire setup happens in one place; vSphere Configuration Profiles, through a guided point-and-click workflow that applies consistently across every host in your cluster. No ESX CLI commands, no scripts, no manual host-by-host coordination. VCF 9.1 also introduces software mirroring as a brand-new feature, delivering enterprise-grade Tier 1 memory redundancy with no additional RAID controllers required. Before we dive in, let’s make sure you’ve got the right pieces in place.
Prerequisites
VMware Cloud Foundation 9.1 deployed and operational.
A cluster with compatible NVMe devices — one per host for basic tiering, two per host if you want software mirroring.
Administrative permissions to manage cluster configuration profiles.
vMotion-compatible VMs so the automation can live-migrate workloads during each host’s maintenance window.
Step-by-Step Configuration
Step 1: Navigate to the Cluster Configuration Profile
Select your target cluster from the vSphere Client inventory.
Click the Configure tab.
Scroll down to vSphere Configuration Profiles (aka Desired State Configuration), your central hub for applying consistent host configurations across the entire cluster. Any setting you define here is automatically pushed to every host uniformly.
Step 2: Create a New Draft
Click Draft and select Create a newDraft
In the left panel, click memtier
Click on nvme, then click Configure Settings
Think of the draft as a staging area. You can build it incrementally and come back to add features like mirroring or encryption without starting over.
Within the draft editor, find the Memory Tiering section:
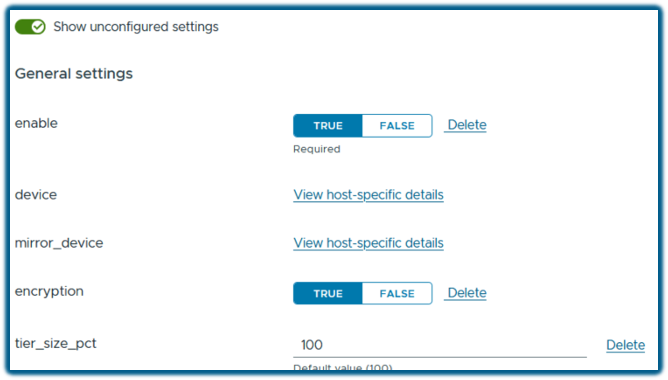
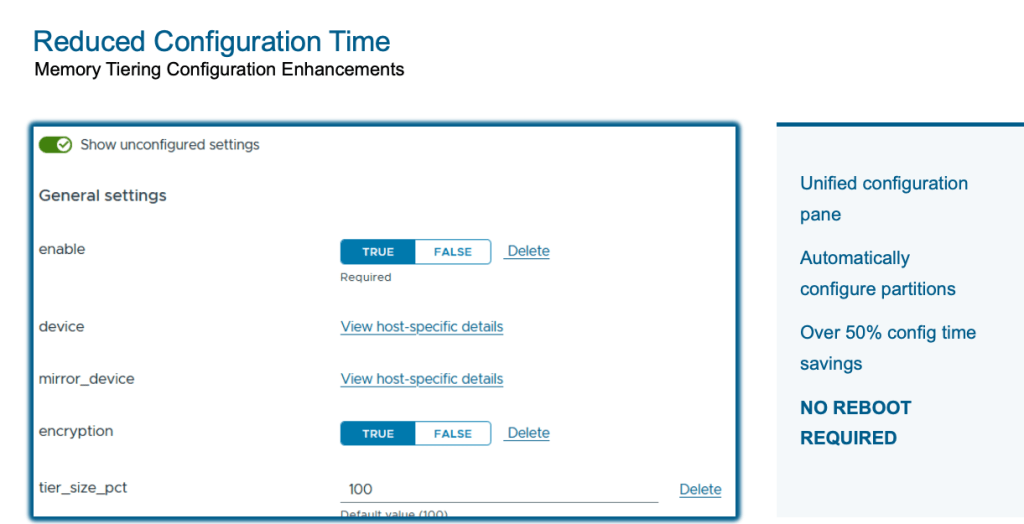
Toggle Memory Tiering onby clicking TRUE next to enable
Select the primary NVMe device to use as Tier 1 memory for each host, by clicking on View host-specific details
Repeat the device selection for every host in the cluster.
That’s the minimum viable configuration. If all you need is extended memory capacity, you’re already done. Make sure the NVMe devices you select are dedicated for this purpose and not shared with VM storage workloads or vSAN.
Step 4 (Optional but Recommended): Enable Software Mirroring
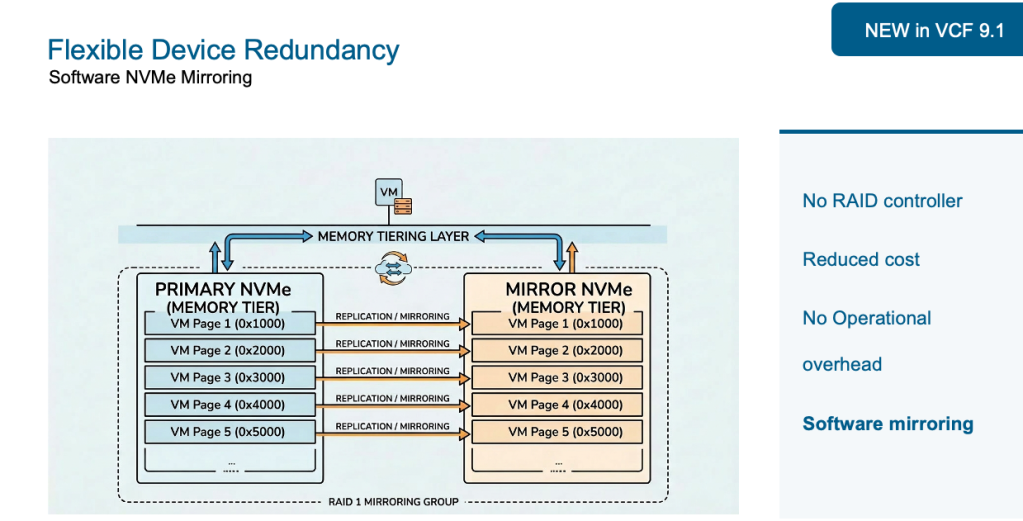
New in VCF 9.1, software mirroring adds redundancy to your Tier 1 memory layer — no specialized hardware required. This is actually a big deal, you get the redundancy you want without the extra expense of Hardware RAID or operational overhead that comes with it.
In the draft editor, click View host-specific details option.
For each host, select a second NVMe device to act as the mirror of the primary. Make sure you select a different device than the previous step.
Repeat for every host.
Each host needs two NVMe devices of equivalent capacity. The mirroring is handled entirely in software, protecting workloads from a single device failure with zero additional infrastructure investment.
Step 5 (Optional): Enable Encryption
If your environment has data-at-rest compliance requirements:
Locate the Encryption toggle in the draft configuration and enable it by clicking TRUE
Easy enough to configure, and it adds meaningful coverage for regulated or multi-tenant workloads.
Step 6 (Optional): Set the DRAM-to-NVMe Memory Ratio
Locate the Size Percentage (tier_size_pct) field in the Memory Tiering section.
Set the value to 100% which is the default and recommended setting. This gives you a 100% increase in effective memory capacity from your NVMe devices.
Step 7: Save and Review the Draft
Click Save to commit your configuration.
Review the summary and verify NVMe device assignments per host, confirm mirroring and encryption settings.
Edit the draft if anything needs adjusting before you proceed.
It’s worth the 60 seconds. Catching a misconfigured device selection here is a lot easier than after the automation has already run.
Step 8: Apply the Configuration
Click Apply Changes and then Remediate, and let the automation take over. Here’s what it handles for you, in order:
Places each host into maintenance mode sequentially. Yes, NO REBOOT required!
Live-migrates VMs off each host before making any changes.
Creates NVMe partitions automatically. No CLI, no scripts, no ssh into every single host.
Applies the memory tiering configuration, then exits maintenance mode and moves to the next host.
The process repeats until every host in the cluster is configured. Go grab a cup of coffee, it’ll all be done when you get back.
Monitoring After Configuration
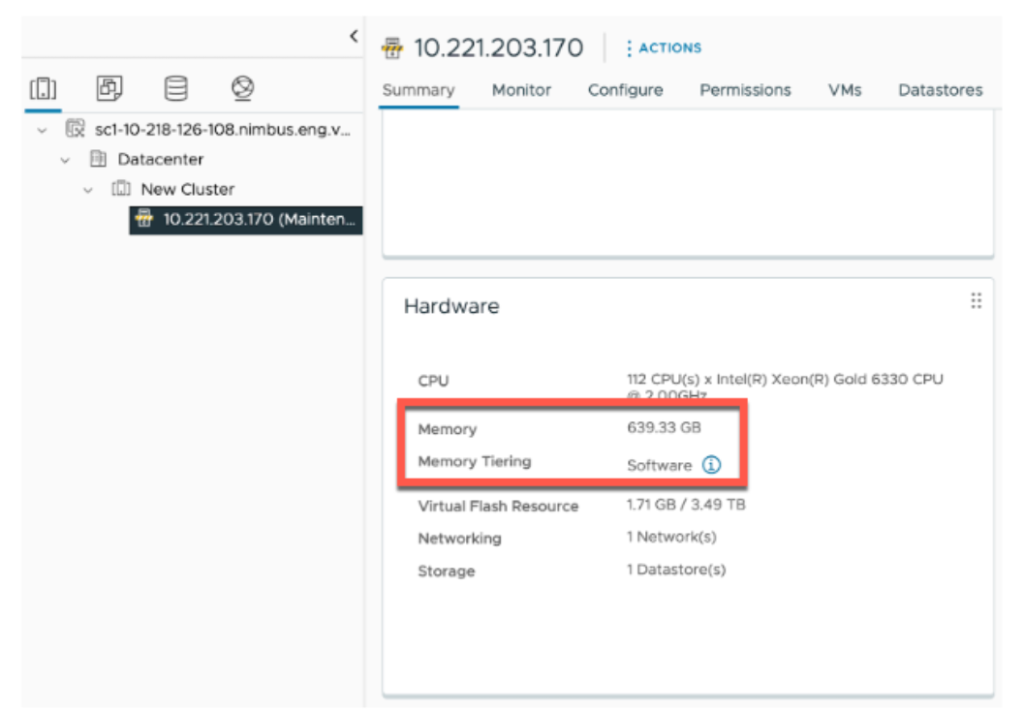
Once complete head to your cluster’s Summary tab. The Memory Tiering panel shows Tier 0 (DRAM) and Tier 1 (NVMe) capacity and utilization across the cluster, plus how many hosts have been enabled.
Drill into any individual host to see DRAM and NVMe capacity side by side, along with active memory utilization, the key metric in memory Tiering to make sure all active memory fits inside DRAM. Watch this over time to validate that Memory Tiering is delivering real value for your environment.
Wrapping Up
Configuring Memory Tiering in VCF 9.1 is genuinely a straightforward, guided workflow that handles the heavy lifting for you. You get more effective memory capacity, optional software-based mirroring for resilience, and full visibility into how your tiers are performing, all without touching the command line. Although you can still do all this from the CLI if you wish, just be aware that those commands are different in VCF 9.1. More on that in a future post, so stay tuned.
Happy Tiering!
Advanced Memory Tiering Enhancements in VMware Cloud Foundation 9.1
If you’ve been anywhere near a server procurement conversation lately, you already know the punchline: memory prices have gone through the roof. Since 2023, enterprise DDR5 RDIMM costs have surged through the roof, driven largely by manufacturers shifting production capacity toward High Bandwidth Memory for AI GPUs. A high-density virtualization node has more than doubled in price and memory alone accounts for over 95% of the Bill of Materials. I’ve started calling it the “RAMpocalypse,” and it’s real.
This is exactly why Memory Tiering matters, and why the improvements we’re shipping in VCF 9.1 are such a big deal. Let me walk you through what’s new.
What Is Memory Tiering?
For those of you who haven’t explored this yet, Memory Tiering allows ESX hosts to use NVMe devices as a secondary memory tier alongside traditional DRAM. VMs consume what we call “logical memory”, which is the unified pool that spans both tiers (DRAM and NVMe); and the hypervisor intelligently classifies memory pages as hot, or cold. Hot pages stay in fast DRAM; cold pages migrate to NVMe. The whole process is transparent to your applications.
The result? Up to 4x more available memory per host, 2x better VM consolidation, 20–30% improved CPU efficiency (because your processors are no longer starved for memory), and up to 40% lower TCO. That’s not marketing fluff — those are the numbers customers are seeing in production.
What’s New in VCF 9.1
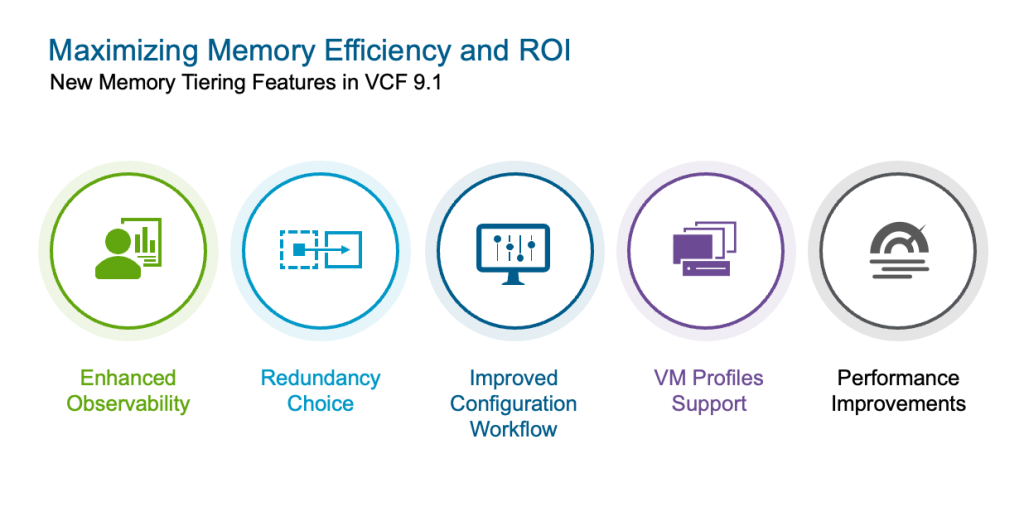
VCF 9.1 brings five major improvements to Memory Tiering, and each one addresses real-world feedback we’ve been hearing since the 9.0 release.
Performance Improvements
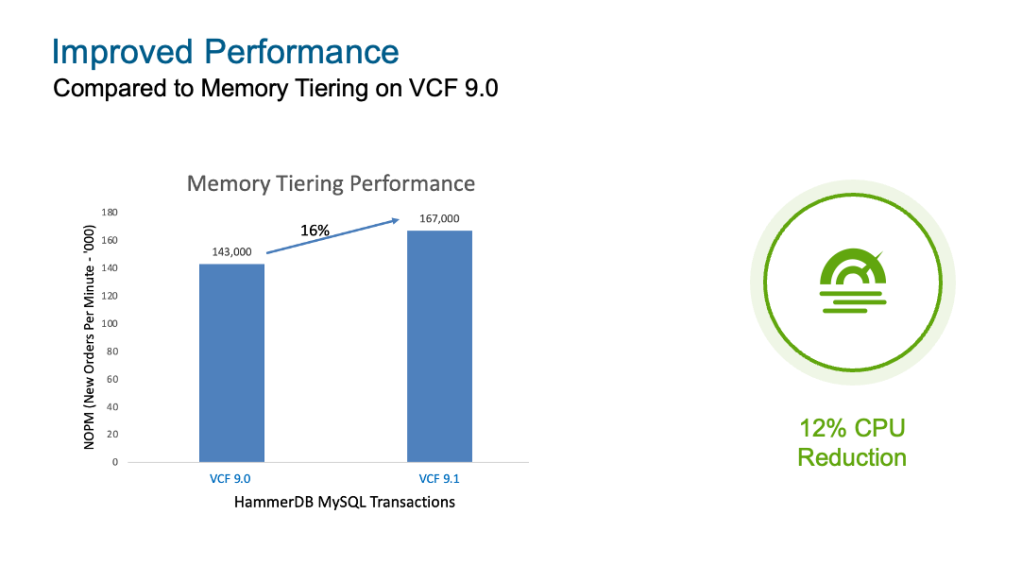
Let’s start with the one everyone wants to know about. Compared to Memory Tiering on VCF 9.0, we’re seeing up to 16% performance gains in database workloads measured with HammerDB, along with a 12% CPU reduction in VMmark benchmarks 1. These aren’t theoretical, they come from optimizations in how the hypervisor manages page classification and tier movement. If you were on the fence about enabling Memory Tiering because of performance concerns, this is your sign to take another look.
Software NVMe Mirroring
This one is a game changer. In VCF 9.0, the only way to get redundancy for your NVMe tier was through hardware-based RAID. Your options were either a Tri-Mode controller, or Intel VROC. That meant additional cost for controllers, operational overhead for firmware and driver management, and potential compatibility headaches with vSAN if you were sharing controllers.
VCF 9.1 introduces software-based NVMe mirroring built directly into vSphere. No RAID controller required. No extra procurement, which means lower cost. No operational overhead required for configuration, installation, FW/drivers, etc. The hypervisor handles mirroring natively, giving it full control over memory page distribution across devices. This is the kind of simplicity customers have been asking for, and it’s here.
Simplified Configuration
Configuring Memory Tiering in 9.0 involved separate steps for NVMe partition creation and feature enablement. That changes in 9.1. We’ve collapsed the entire workflow into a single unified configuration pane using vSphere Configuration Profiles. NVMe disk partitions are now created automatically (no more manual ESXCLI commands or PowerShell scripts, though you still can if that’s your thing). And here’s the best part: the configuration no longer requires a host reboot. Just maintenance mode. The net result is over 50% reduction in configuration time. Easy enough, right?
Enhanced Observability
You can’t optimize what you can’t see, and VCF 9.1 delivers significantly better visibility into your Memory Tiering environment. In vCenter, new summary cards at both the host and cluster level show configuration state, tier breakdowns, consumed memory per tier, and consumed versus active comparisons. You also get a full tiering device list with health status details.
Post-deployment, you can monitor bandwidth and latencies for both memory tiers, and even drill down to see tier bandwidth utilization at an individual VM level. This gives you the performance visibility you need to validate that Memory Tiering is working as expected for your specific workloads.
On the VCF Operations side, there is a dedicated Memory Tiering dashboard, and perhaps my favorite addition, a “What-If” analysis tool. This lets you model what would happen if you turned Memory Tiering on based on your environment, and what your cost savings would look like. It’s a fantastic way to build the business case before you even flip the switch.
VM Profile Support
In VCF 9.0, certain VM profiles couldn’t power on when Memory Tiering was enabled on a host. That restriction is completely gone in 9.1. Security VMs, low-latency VMs, fault-tolerant VMs, among others can all power on now. While some of these profiles still won’t participate in tiering directly, you no longer need to maintain separate hosts just to accommodate these type of VMs.
And one more thing, nested virtualization is now fully supported with Memory Tiering. If you’re running nested VMs in your lab environment, they’ll participate in tiering just like any other workload.
The Bottom Line
Let’s bring this home with the business case. Memory Tiering in VCF 9.1 delivers up to 40% lower TCO through better VM consolidation ratios and increased resource consumption. Those underutilized CPUs you’ve been paying for? You can finally put them to work.
Don’t worry if you’re not sure where to start, the new What-If analysis in VCF Operations makes it straightforward to assess your environment and quantify the savings before committing. Memory Tiering is production-ready, it’s shipping now, and it fundamentally changes the economics of memory in virtualized environments.
These tests were run using a VMmark 3 benchmark version customized under the research rules for increased memory usage and with only application workloads ↩︎
Understanding Large Memory Pages with VMware Advanced Memory Tiering
If you’ve been setting up VMware Memory Tiering or thinking about it, you’ve probably asked yourself at some point: what happens to Memory Large Pages? It’s a great question, and I’m glad you’ve asked it, because the answer changes how you need to plan your capacity and configure your VMs. Let me walk you through it.
Let’s Set the Stage
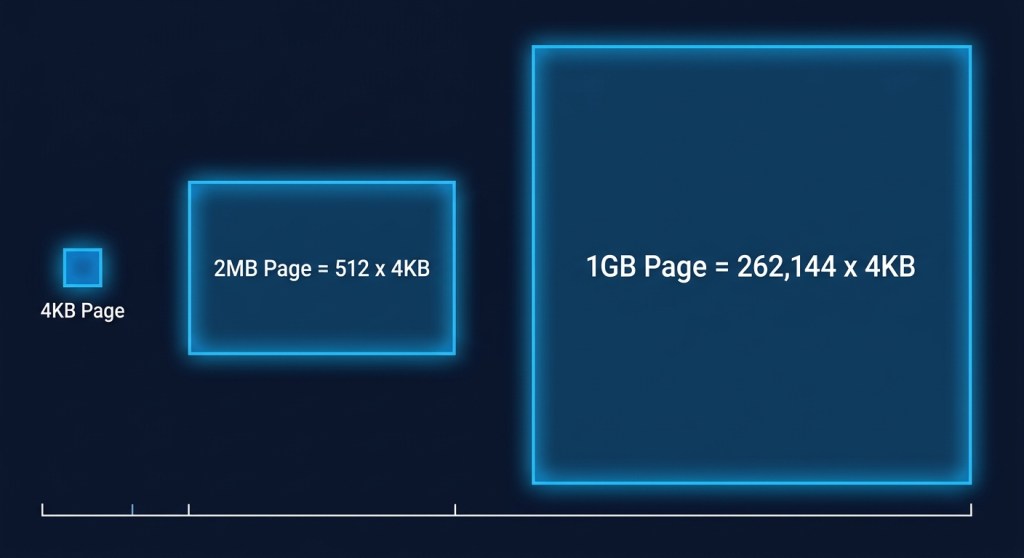
Before we get into the tiering-specific behavior, let’s quickly recap what Large Pages are and why they matter. The x86 architecture supports three page sizes: 4 KB (small pages), 2 MB, and 1 GB. The latter two are collectively called “Large Pages”. Think of page size like the denomination of bills in your wallet. Larger denominations are more efficient to carry around, but harder to make change with. Large pages work the same way; they reduce TLB (Translation Lookaside Buffer) pressure and cut the cost of page table walks, which translates to potential performance gains for memory-intensive workloads. ESX uses 2 MB pages to back guest virtual RAM by default, and for good reason: the performance benefit is well established.
So when Memory Tiering enters the picture, you’d naturally assume large pages stay on. Here’s where things get interesting.
Memory Tiering Changes the Equation
When you enable Memory Tiering on a host, VMs are configured with Large Pages disabled from tiering by default. I know, it sounds counterintuitive at first. But let me explain why this actually makes sense.
The tiering algorithm, which lives inside the memory management layer of ESX, works by monitoring every page’s “hotness” and “coldness”. Active pages, your VM’s working set, stay in Tier 0 (DRAM) for maximum performance. Cold pages migrate to Tier 1 (NVMe) when memory pressure builds. This is smart, automatic, and requires no manual intervention. But here’s the catch; it needs fine-grained control to do that job well.
How does that change things for large pages? A 2 MB Large Page is an atomic unit, and you just can’t move half of it to NVMe. The entire 2 MB block moves together, or not at all. That’s like trying to make precise temperature adjustments with a thermostat that only moves in 10-degree increments. It works, but it’s not precise. At 4K granularity, the tiering engine can make surgical decisions about exactly which pages are hot and which are cold. That precision is what makes Memory Tiering perform well, so the default is small pages.
The Three Page Size Scenarios
Let’s compare the three memory page sizes and how they respond to Memory Tiering. Easy enough to understand once you see them laid out. Here’s where each page size lands.
4 KB Small Pages: Fully Optimized
This is your sweet spot. Performance has been specifically optimized for 4K pages when Memory Tiering is active. The tiering algorithm operates at maximum precision, hot pages stay in DRAM, and cold pages gracefully offload to NVMe. ESX intentionally disables host-level large pages when Memory Tiering is configured. To accurately monitor and move memory without incurring massive performance overhead, ESX reverts to backing guest memory with standard 4KB base pages. By working at the 4KB level right out of the gate, ESX’s tiering engine doesn’t have to constantly break down massive pages to figure out what data is actually being used.
2 MB Large Pages: Opt-In, with a Catch
The default configuration in vSphere is to have Large Pages (2MB) enabled (Mem.AllocGuestLargePage set to 1); however, 2 MB large pages are not enabled by default for tiering purposes when Memory Tiering is active.
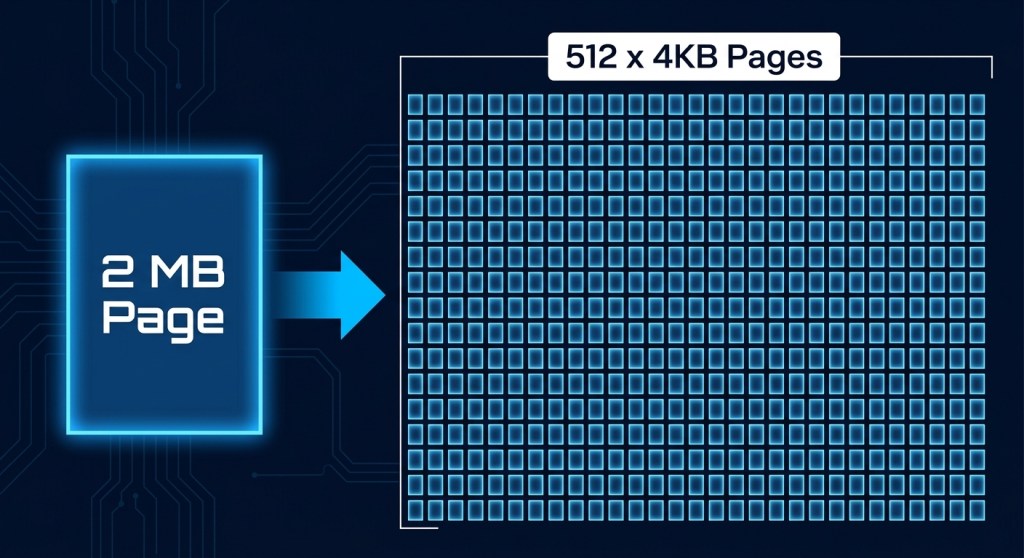
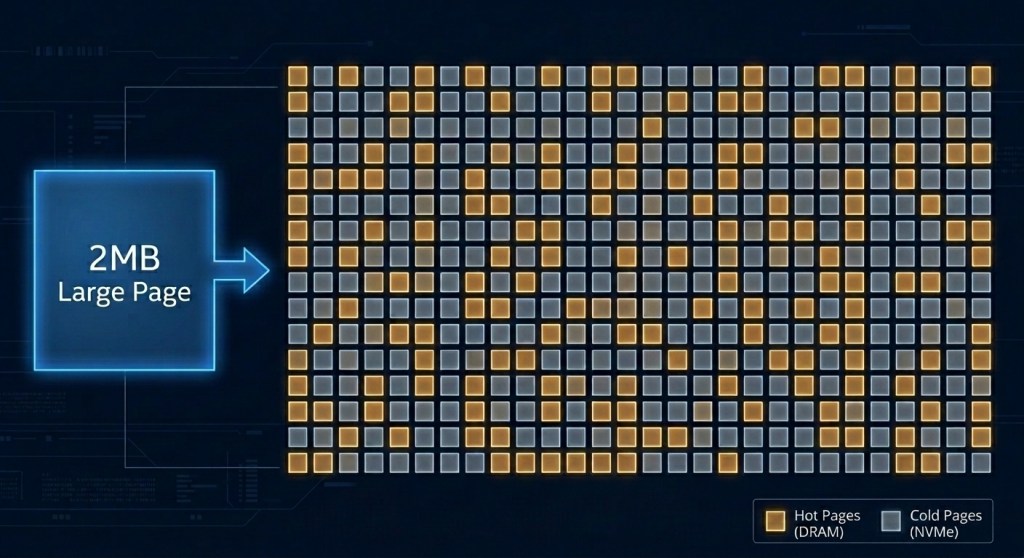
A 2 MB page is made up of 512 individual 4K pages. Let’s say 400 of those are hot and actively being used. Ideally, you want that large page to stay intact in DRAM. But that means the remaining 112 cold pages are also stuck in DRAM, even though they could have been tiered out to NVMe. Those 112 pages represent stranded capacity, and that is just one large page. Multiply that by any number and you will quickly realize that thousands of cold pages could be left in DRAM rather than being tiered out to NVMe. At 4K granularity, the tiering engine would have reclaimed them. At 2 MB granularity, it cannot, because moving half a large page is not an option.
To use 2MB Large Pages with Memory Tiering, you need to explicitly set a VMX option on the VM (monitor_control.disable_mmu_largepages = “FALSE”). Once set, the VM falls into the general tiered memory pool, but here is where it gets interesting. When large pages are enabled, the tiering algorithm proactively breaks a subset of large pages based on certain heuristics and will either tier out the cold pages in the 2M region or convert it back to large.
This is the core tension: large pages and tiering pull in opposite directions. Tiering is most effective when it can reclaim at the finest granularity possible, which is 4K. Large pages deliberately reduce that granularity to improve TLB efficiency. The two are fundamentally at odds, and that tradeoff is worth understanding before you opt in.
1 GB Pages: DRAM Only, No Exceptions
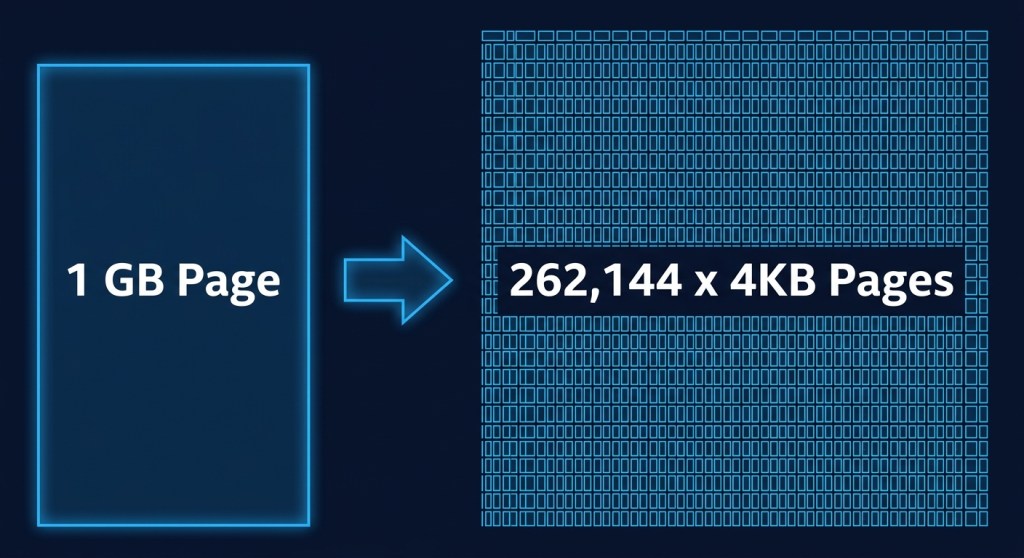
This is the hard line. VMs configured to use 1 GB pages are automatically locked to Tier 0 (DRAM) and will never use NVMe Tier 1 capacity. Memory Tiering enforces this automatically, so you don’t need to configure anything special. But you do need to account for it in your capacity planning. These VMs need to be sized against your available DRAM, not your total tiered memory capacity. Flag them early.
The TPS Angle
Here’s a secondary effect worth understanding, especially if you rely on Transparent Page Sharing (TPS) for memory efficiency. How does enabling large pages in a tiered environment affect TPS? Not well, as it turns out.
TPS doesn’t share large pages directly. On modern hardware with Intel EPT or AMD RVI, which use 2 MB pages, TPS is largely ineffective anyway, because the probability of finding two identical 2 MB regions is very low and comparing them carries significant overhead. Large pages have to be broken down into 4K small pages before TPS can share them, and that only happens under specific memory pressure states.
What this means practically enabling large pages in a tiered environment reduces both the effectiveness of the tiering algorithm and any TPS savings you might have been counting on. The two techniques point in opposite directions when it comes to page size. So, think about some workloads such as VDI or dense VM environments where TPS historically helped you, and consider whether you want to trade that away.
The Bottom Line
Memory Tiering makes a deliberate trade; it gives up the TLB efficiency of large pages in exchange for the operational precision needed to make intelligent tier placement decisions. For most workloads, that’s a worthwhile trade, especially as Tier 1 NVMe latency continues to improve.
Here’s how to think about it when planning your tiered environment:
Default to 4K pages for VMs you want to benefit from tiering
Flag your 1 GB page VMs early in capacity planning, as they are DRAM-only consumers
Evaluate 2 MB large page VMs carefully: test first, and don’t assume the same performance characteristics you’d see in a non-tiered environment
Getting ahead of the large page question before you enable Memory Tiering will save you a lot of head-scratching later. And don’t worry, the system handles most of this automatically once you understand the rules.
NVMe Memory Tiering Design and Sizing on VMware Cloud Foundation 9 Part 7: Advanced Configuration
This is the final installment of our series on Memory Tiering. In previous posts, we covered the architecture, design, sizing, and basic setup among other topics. Now, we’re diving into the advanced configuration. These settings are not necessary for this feature to be operational, but rather provides options for data encryption, and memory ratios among others.
While the defaults in vSphere in VMware Cloud Foundation 9.0 are designed to “just work” for most environments, true optimization requires fine-tuning. Whether you are running virtual desktop workloads or databases, you need to know which levers to pull.
Here is how to master the advanced parameters for memory ratios, per host and per VM encryption, as well as disabling per-VM tiering.
Adjusting the DRAM:NVMe Ratio
By default, when you enable Memory Tiering, ESX sets a DRAM to NVMe ratio of 1:1, or 100% more memory coming from NVMe. This means if you have 512GB of DRAM, the host will have an additional 512GB of NVMe capacity as Tier 1 memory, resulting in 1TB of total memory.
However, depending on your workloads, you might want to change this density. For example, in a VDI environment where cost-per-desktop is king, you might want a higher ratio (more NVMe per GB of DRAM). Conversely, for performance-heavy clusters, you might want to limit the NVMe tier size.
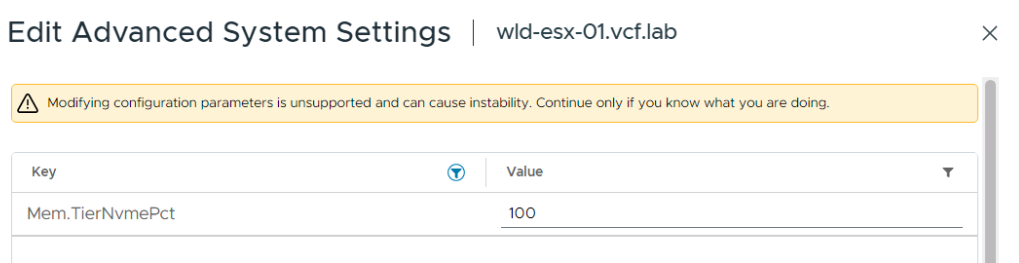
You control this via the Host Advanced System Setting: Mem.TierNVMePct.
The Parameter
Scope: Host Advanced System Setting
Key: Mem.TierNVMePct
Value: Percentage of DRAM to use as NVMe tier
100 (Default): 100% of DRAM capacity (1:1 ratio).
200: 200% of DRAM capacity (1:2 ratio)
50: 50% of DRAM capacity – very conservative sizing (2:1 ratio).
Note: The recommendation and best practice advice is to keep the default ratio of 1:1 as it is applicable to most workloads. If you decide to change the default ratio, you must first thoroughly evaluate your workloads and make sure all active memory can fit in the host’s DRAM capacity. See Part 3 of the series to learn more about Memory Tiering sizing.
Securing the Tier: Encryption
One of the architectural differences between DRAM and NVMe is persistence. While standard RAM loses data (almost) instantly upon power loss, NVMe is non-volatile. Although VMware handles page clearing, security-conscious organizations (especially in regulated sectors) often require Data-at-Rest Encryption for any data written to disk, even if that disk is acting as memory. Refer to Part 2 of the series for a deeper dive on NVMe encryption for Memory Tiering.
You have two layers of control here: protecting the entire host’s NVMe or selecting certain VMs so that only that data is encrypted instead of all VMs within the host.
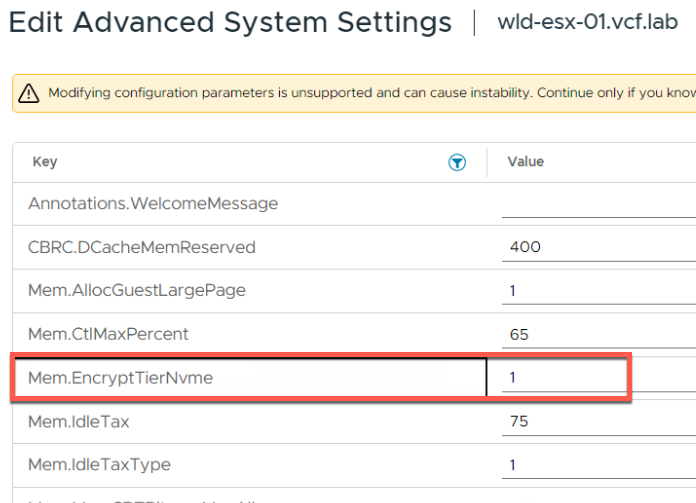
Option A: Host-Level Encryption
This is the “blanket” approach. It ensures that any page swapped from DRAM to the NVMe tier on this host is encrypted using AES-XTS.
The Parameter
Scope: Host Advanced Configuration Parameters
Key: Mem.EncryptTierNvme
Value: 1 (Enabled) or 0 (Disabled)
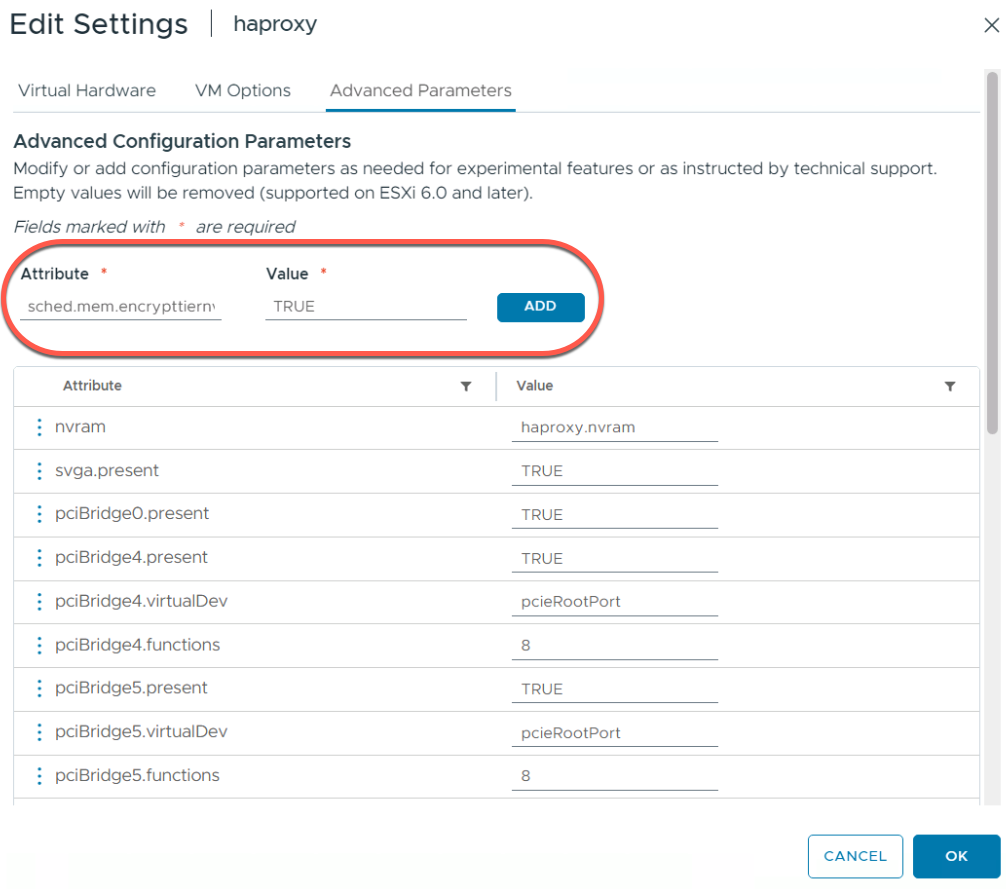
Option B: Per-VM Encryption
If you want to only specify certain VMs to have encryption for the memory pages that reside on NVMe, you can enable it only for high-value workloads (e.g., Domain Controllers, Finance DBs).
The Parameter
Scope: VM Advanced Configuration Parameters
Key: sched.mem.EncryptTierNVMe
Value: TRUE
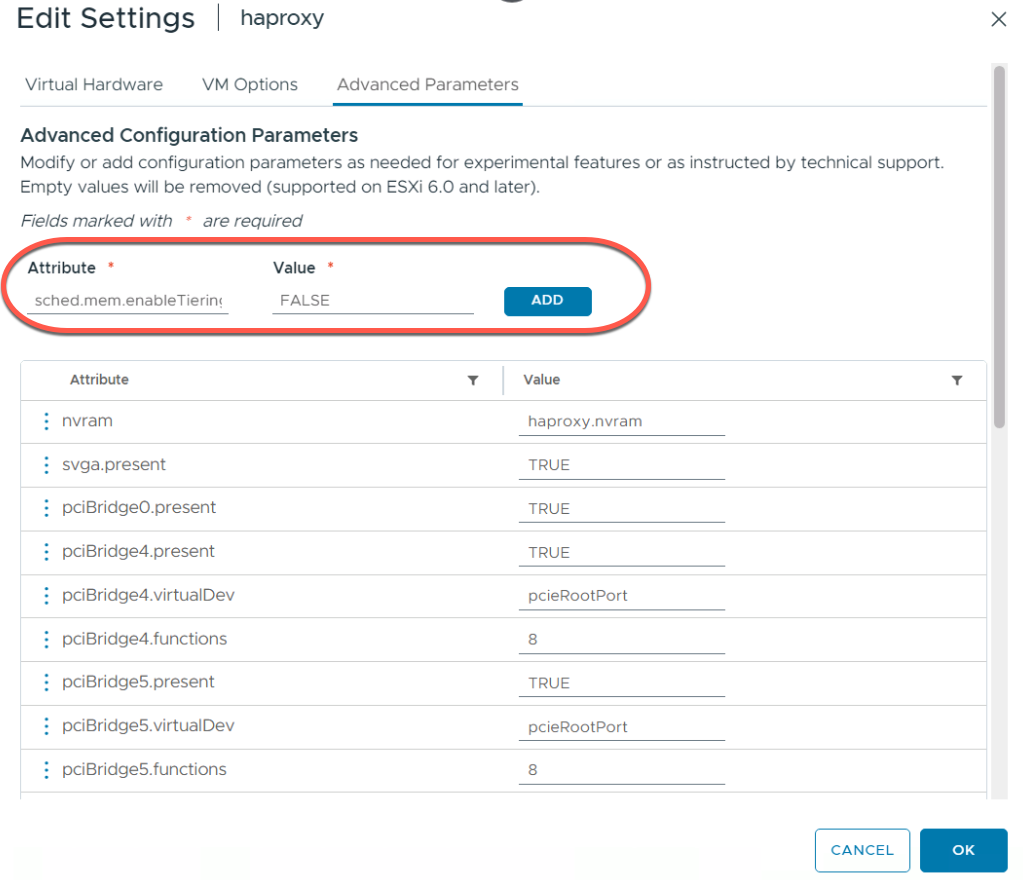
Opting Out: Disabling Memory Tiering for Critical VMs
Memory Tiering is excellent for “cold” data, but “hot” data belongs in DRAM. While the ESX scheduler is incredibly smart about memory page placement, some workloads are simply too sensitive to risk any latency spikes associated with tiering.
Typical Use Cases:
SAP HANA or other In-Memory Databases.
High-Frequency Trading applications.
Security VMs.
In addition, there are a few VM profiles that are currently not supported for Memory Tiering such as low latency VMs, FT VMs, large memory pages VMs, etc. For such VM profiles, you should disable Memory Tiering at the VM level. This forces the VM’s pages to reside only in Tier 0 (DRAM). For a complete list of VM profiles please refer to this official document.
The Parameter
Scope: VM Advanced Configuration Parameters
Key: sched.mem.enableTiering
Value: FALSE
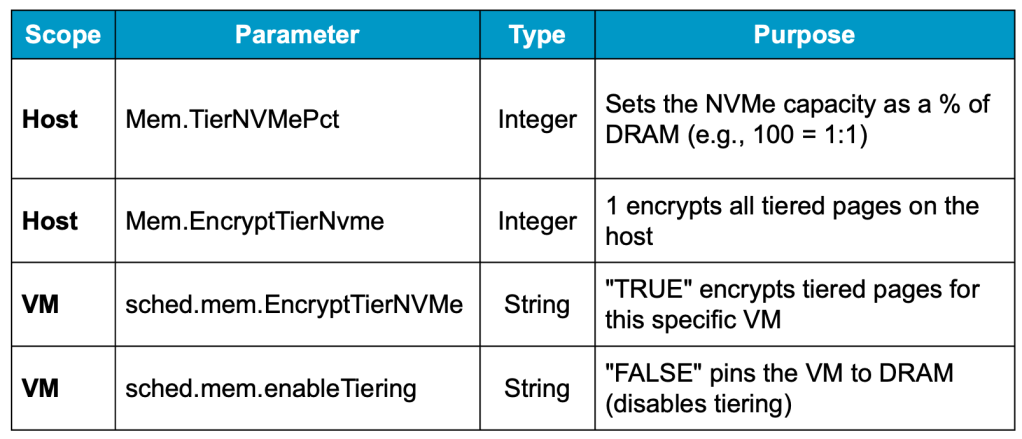
Summary of Advanced Parameters
Final Thoughts
Memory Tiering in VCF 9.0 represents a massive shift in how we think about server density, and smart resource consumption. It moves us away from the rigid “RAM limit” and gives us a flexible, cost-effective buffer. However, like any powerful tool, the defaults are just the starting point. Using the parameters above, you can tailor the behavior to fit both your budget and your SLAs.
vSphere Memory Tiering – Tech Preview in vSphere 8.0U3
VMware Application Acceleration
vSphere Memory Tiering – Tech Preview in vSphere 8.0U3
This is a very exciting feature that we are releasing as tech preview as part of vSphere 8.0 Update 3. Customer can now evaluate the Memory Tiering feature in their lab environments with vSphere 8.0 U3.
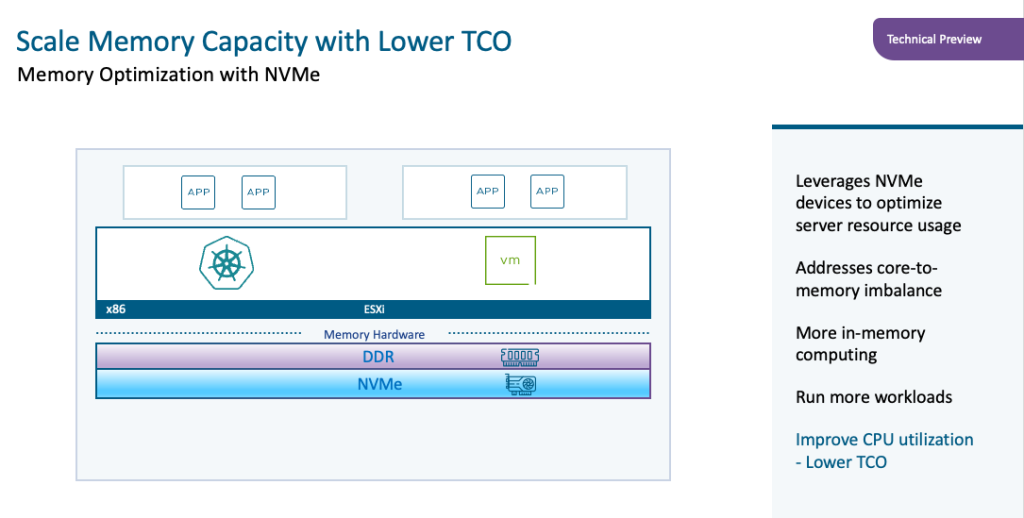
In essence, Memory Tiering leverages less expensive devices to act as memory. In vSphere 8.0 Update 3, vSphere leverages PCIe-based Flash NVMe devices to act as a second layer of memory, resulting in an increase of available memory within the ESXi host. Memory tiering over NVMe optimizes performance by directing VM memory allocations to either NVMe devices or faster dynamic random-access memory (DRAM) in the host. This allows for an increase of memory footprint and workload capacity, while reducing the total cost of ownership (TCO).
Memory Tiering also addresses core-to-memory imbalances, and aids in better workload and VM consolidation.
Memory Tiering is configured on each host on a cluster, and all host must be running vSphere 8.0U3. The default configuration ratio of DRAM to NVMe is 4:1 ratio but can be changed to utilize more NVMe resources as memory.
For a Technical Guidance on deployment please visit this KB Article
Extreme Performance Series 2026: Advanced NVMe Memory Tiering VCF 9
Memo
Advanced Memory Tiering Now Available with VMware Cloud Foundation 9.0
ry tiering with NVMe drives – really useful these times where RAM is really expensive
🔹 Step-by-Step Explanation of Ballooning, Compression & Swapping in VMware ⸻ 1️⃣ Memory Ballooning (vmmemctl) Ballooning is the first memory reclamation technique used when ESXi detects memory pressure. ➤ Step-by-Step: How Ballooning Works 1. VMware Tools installs the balloon driver (vmmemctl) inside the guest OS. 2. ESXi detects low free memory on the host. 3. ESXi inflates the balloon in selected VMs. 4. Balloon driver occupies guest memory, making the OS think RAM is full. 5. Guest OS frees idle / unused pages (because it believes memory is needed). 6. ESXi reclaims those freed pages and makes them available to other VMs. Why Ballooning Happens? • Host free memory is very low. • ESXi wants the VM to release unused pages before resorting to swapping. Example • Host memory: 64 GB • VMs used: 62 GB • Free: 2 GB → ESXi triggers ballooning • VM1 (8 GB RAM): Balloon inflates to 2 GB → OS frees 2 GB → ESXi re...
vCenter Troubleshooting Tips, Common Issues & Log Locations 🚀 1. General Troubleshooting Approach A. Check service health first For vCenter Server Appliance (VCSA): Shell https : / / < vcenter - FQDN > : 5480 Show more lines Go to Services → Health to verify: vCenter Server ESXi hosts vSphere Client DNS, NTP, DB connections vpxd, vpxd-svcs, vsphere-ui B. DNS & NTP checks vCenter is highly dependent on correct DNS & time sync. Check: Shell nslookup < vcenter - fqdn > nslookup < esxi - host - fqdn > Show more lines Time drift > 5 minutes causes: Login failures vpxd crashes PSC authentication issues C. Check storage/database health Slow DB/storage = UI slow, tasks hung. For VCSA: Shell df - h du - sh / storage / log / * / var / log Show more lines Free up space if partitions hit >80%. D. Restart critical services safely On VCSA: Shell service - control - - status service - control - - stop - - all service - control - - start - - all ...

Comments
Post a Comment